
Have you looked at breast augmentation scars and worried about how yours might look if you choose to get breast implants? There are four main factors at play: the skill of your surgeon, how you care for your scars, your individual ability to heal, and the time that has passed (at first, all scars are more red and raised, but they ideally will flatten and blend with your skin tone and anatomy).
Below, our Granite Bay plastic surgeons explain where incisions are placed, what scars look like, and how to care for your scars so that they eventually heal to very fine, near-invisible lines.
Where your incisions will be
You have two primary options for where your surgical incisions are placed—and thus, where your scars will be. Each incision pattern has its advantages, and you don’t have to decide alone! You will make this decision in collaboration with your plastic surgeon. It’s smart to keep an open mind going into your consultation because other preferences, like your desired breast implant placement over or under the muscle, may affect which incisions are ideal for you.
Inframammary
The most popular incision type is placed along the breast crease, underneath the breast base. The well-hidden inframammary incision placement offers your surgeon excellent access to the implant pocket, while the breast’s shape camouflages the scar easily. Further, this incision can be used for any future surgeries, i.e. if implants are removed or replaced. It is also optimal for preserving milk ducts if you plan to breastfeed in the future.
Periareolar
Another option for your breast incision is the periareolar incision, which is placed around the lower edge of the areola—the pigmented area encircling the nipple. The scar is concealed in the edge of the areola, and avoids placing “visible” scarring on the breast skin. Since periareolar incisions are associated with a slightly higher risk of capsular contracture (in which the scar tissue around implant tightens), we tend to perform more inframammary breast augmentations.
Alternative incision sites
Some cosmetic surgeons offer transaxillary (armpit) and transumbilical (belly button) incision options. However, at Granite Bay Cosmetic Surgery we advise against these alternative breast augmentation incision sites. They have several drawbacks, including decreased visibility for the surgeon when it comes to placing your implants and shaping the breast. Your implant choices will also be more limited; these incision sites are not well-suited to placement of larger silicone gel implants, a choice many patients prefer for their natural feel.
What scars look like after breast augmentation
Breast augmentation scars go through a gradual, 24-month maturation process: you can expect your scars to start off slightly raised and red or pink (assuming you’re caring for your incisions and scars in the weeks and months after surgery—more on that below!). If you have a lighter skin tone, they may be more noticeable at first. Over time, scars flatten and fade to a shade closer to your skin tone. In these before and after photos of our Granite Bay patients’ results, you can see that their thin inframammary incisions are concealed in the shadow of the breast crease.

This patient had breast augmentation with 450cc smooth, round silicone breast implants. They were placed in the submuscular plane using an inframammary fold incision. “After” photos were taken 6 months after initial breast augmentation.
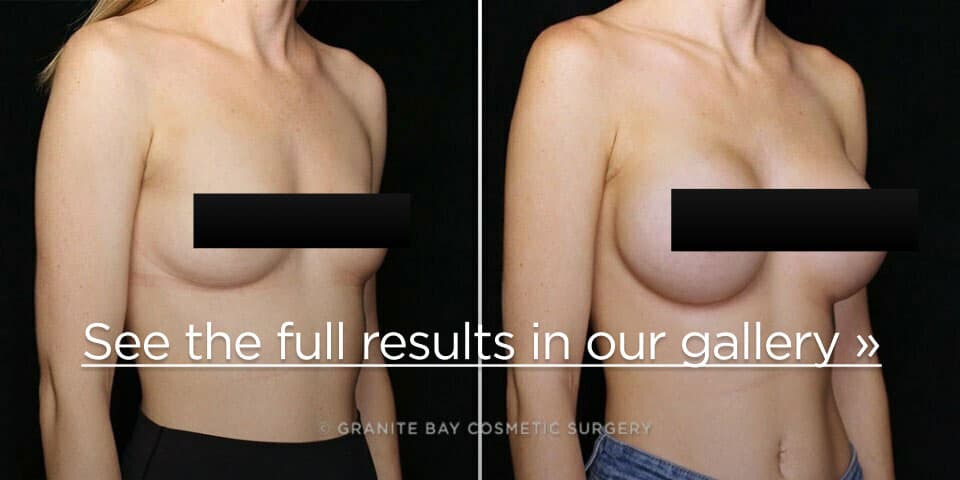
This patient had breast augmentation with smooth round silicone implants (L 385cc, R 365cc) placed submuscularly using an inframammary fold incision. “After” photos were taken 6 months after initial breast augmentation.
Breast augmentation with breast lift scars
Patients who undergo a breast lift with implants will have additional incisions around the edges of the areola, typically including a vertical incision that connects to the inframammary fold. The below before and after photo shows one of our Granite Bay patients with these “anchor” pattern incisions. Her scars have flattened, yet they still have the pink pigmentation that light-skinned patients see as their scars are in the process of fading.
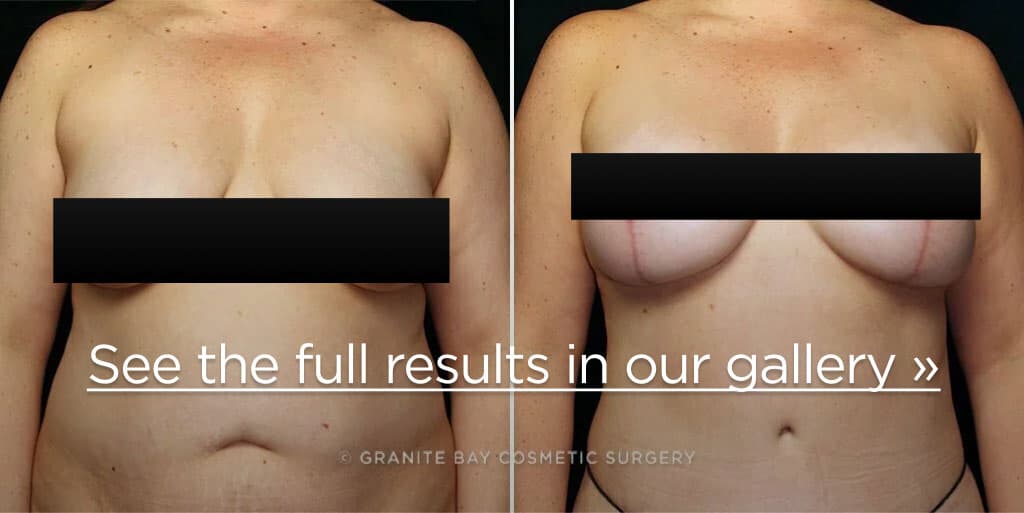
This patient had breast augmentation with 255cc breast implants placed under the muscle, as well as mastopexy (breast lift) as part of her complete mommy makeover (abdominoplasty, liposuction, and breast surgery). “After” photos were taken 6 months after initial breast augmentation.
How long does it take for breast augmentation incisions to heal?
Breast augmentation incisions take up to 2 weeks to heal and close. They will initially be darker than your skin tone, raised, and bumpy in texture, but will gradually soften and fade if you follow all of your post-op instructions. It takes about six weeks before the scars begin to fade, and their color should be less noticeable after 2-3 months. They are usually very faded and barely noticeable by 1 year post-op, and they will continue to improve from there.
How to care for your breast scars
Your choice of an experienced plastic surgeon will go a long way towards having minimal scars and fabulous results, but there’s also a part that you play. Your post-operative care instructions will include restrictions on exercising for 4-6 weeks, and you’ll want to avoid smoking, eat a healthy vitamin-rich diet, and protect scars from sun exposure. Beyond these basics, it’s important to be well-educated about incision and scar care—these have an equally strong impact on your final results.
Scars are usually faded and barely noticeable by 1 year post-op, and they will continue to improve from there.
1. Protect healing incisions
The first crucial step in the process is to protect your healing incisions for the first 2 weeks or so after surgery. You will have steri-strips that cover your breast incisions, and you can simply let the water in the shower fall over them and gently pat them dry.
The steri-strips don’t just protect your incisions from contact or abrasion: they are also holding together the two sides of each incision to help keep your final scars as narrow as possible. Strictly follow your surgeon’s instructions about exercise or strenuous activity, and avoid any movements that could strain and thus expand the width of your incisions, i.e. intense workouts or stretching your arms overhead to reach things.
2. Apply silicone to healed incisions to minimize scars
Once your incisions have progressed in their healing and we give you the go-ahead, you can start scar care with silicone. While there are abundant “scar creams” on the market, the only substance that has proven to be effective at minimizing scars’ appearance is silicone. It can be bought as either a sheet for cutting strips that you apply to the incision, or as a gel. The strips are sticky on one side to adhere to the scar. However, in some areas of the body it can be difficult to get them to stick. This is where silicone in gel form is useful.
We include Biocorneum® silicone gel in all of our breast enhancement patients’ surgical packages. Apply a thin layer of the gel to clean, dry skin both morning and night, and allow it to dry completely. You may cover healing scars with a compression bra, clothes, or even cosmetics and sunscreen if you wish.
We recommend using silicone gel for about 8 weeks, or until the scar is flat and no longer thick—in other words, keep using the gel for some time even after your breast augmentation recovery is complete and you are back to working out, wearing bras, and feeling your best.
Silicone strips or gel can be bought at your plastic surgeon’s office, on the internet, or through a local drug store. We recommend applying the silicone gel 2-3 times a day for 8 weeks. In addition to Biocorneum, some of the gels we have used and recommend include:
- Silagen
- Xeragel (gel), Prosil (stick), or Dermasof (all made by the same company)
While we have not used New Gel+ or Scar Away, these do appear to be silicone-based. Any scar gel should be silicone-based, but some popular brands (such as Mederma) do not have any silicone in them. While these scar creams likely won’t hurt you, it’s hard to know if they are effective and we recommend choosing a proven option.
3. Massage thick, firm scars
If the scar is thick and firm, massage with gentle pressure directly over the thickened areas, lubricating with lotion or Vitamin E oil. We ask patients with thick scars to do this multiple times a day for 3-5 minutes each time.
If you are using silicone gel or sheeting, you will need to remove it before massage since Vitamin E oil will break down the silicone. Wash the area with soap and water, and dry completely, before reapplying the silicone.
4. Protect incisions & scars from the sun
Your scars will be very pink to start and gradually fade over the next 6-12 months. However, sun exposure can lengthen the time it takes for a scar to mature, or leave it permanently discolored. Prevent sun exposure by keeping the scar covered with opaque clothing, a Band-Aid, silicone gel sheet, and/or wear sunscreen of SPF 30 or greater, reapplying every 90 minutes.
About Granite Bay Cosmetic Surgery
Our Granite Bay cosmetic surgery center offers a full range of breast surgery procedures—from breast lift to reduction, to breast implant removal and revision. To schedule your consultation and learn what we can do for you, call (916) 242-2662 or contact us online today! We can’t wait to help you look and feel your most gorgeous.